
If you have no experience with programming, this walkthrough on how to make a word cloud is just for you. A word cloud is a bunch of key terms whose size approximates their importance. I made one for my book Among Digitized Manuscripts and I tweeted the result:
A word cloud for a book this size works brilliantly; at 125.000 words it can be difficult to capture a summarizing essence of it and a computed graphic like this at least does something in that regard.
What is a Python Notebook?
With this article I am not only introducing you to making word clouds, I am also introducing you to using the programming language Python without having to install anything on your computer. In fact, we are not even going to run the code on our computer; all of it is in the cloud. In this case we are using Microsoft’s cloud which is called Azure. You might wonder how this is going to work, and the answer is: Jupyter notebooks. Here is one YouTube video to introduce it:
I also like this introductory video, if you have 18 minutes, give it a view:
So basically a notebook is a sheet with snippets of code interspersed with comments. The code is in Python, the comments in Markdown.
Here is the important bit: Click here to go to my notebook that explains step-by-step how to make a good word cloud
You may want to click through to the notebook and follow the instructions there. Here I will briefly highlight the strategy I used.
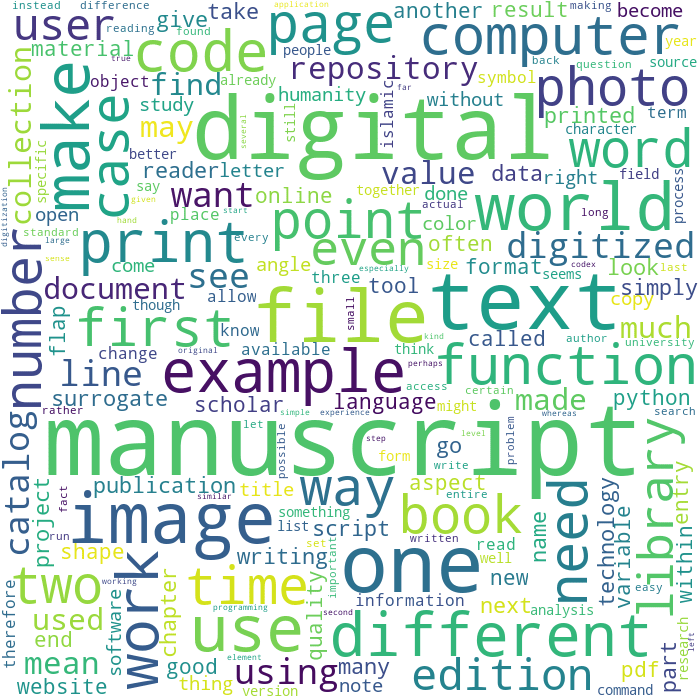
I first had to load in the entire text of the book, without footnotes. I then had to make the text as flat and neutral as possible. Obviously, we want the computer to recognize Manuscript and manuscript as the same thing, so an example of making the text ‘flat’ is making everything lower case. I also removed numbers and punctuation. Now we already have a fairly regular text but I added one more thing: we also want manuscripts and manuscript to be recognized as the same word, so we let a fancy package called NLTK ‘lemmatize’ it. NLTK stands for Natural Language ToolKit and can perform very impressive tasks with relative ease. We are now already left with an unreadable text; that is, it does not cohere to grammar rules but it comes at the advantage of being prepared for automated analysis. Next to lemmatizing it, we let NLTK do another big task, namely, remove all words that are so simple and so frequently used, they really do not add any value (words like and, thus, if). At this point, the text is not even a text anymore, just a bag of words. Only now do we ask of NLTK to give us back the 350 most used words and we save these words together with a count in a text file. The first four are:
- manuscript – – used 639 times
- digital – – – – – used 471 times
- text – – – – – – – used 410 times
- one – – – – – – – used 400 times
I gave the first four and not the first three because number 3 and 4 are close in their count while number 5 trails way behind (it is file, with 331 times, after that comes image, 304 times). Including number 4 also gives us a good example of what happened: while we removed stop words, we still have ‘garbage’ in our list. The word one does not say anything about this book and like that there are many other words. I trimmed the list of 350 words down to 226 and I did this by hand and my own judgment. These words really do capture the topic of the book quite well. Manuscript, digital, text, file, image, — yup that is exactly what I am talking about in my book! So now we have the phase of data collection and data cleaning completed, we can finally move on to data visualization.
To do so, I did one more tiny step of cleaning. I prepared a new text with only those 226 words but as many times of each word as they occurred in the original text. It would be meaningless for us to see the word manuscript written 639 times, followed by the word digital 471 times and so forth, but this gives us yet again a more pure text for the computer to generate a word cloud from. With the packages matplotlib and wordcloud, it was only a few more lines of code to generate the image (you can add a line to save as .png to disk).
I hope you will be able to tinker around with the code and step-by-step learn what each piece is doing. Go ahead and give it a try.
- Click here to go to my notebook that explains step-by-step how to make a good word cloud
- If you prefer to download and use it yourself, find the files here in my repository.